Table of Contents
MySQL Master:
The MySQL master server assumes the role of the primary server, overseeing write operations and governing the core dataset. It functions as the definitive point for all alterations to the database. Each time new data is introduced or existing data undergoes modification, the master meticulously documents these changes in its binary log.
MySQL Slave:
The MySQL slave server functions as a replication counterpart to the master server. It exclusively manages read operations and operates by subscribing to the modifications executed on the master. Establishing a connection to the master, the slave replicates the alterations logged in the master’s binary log and subsequently implements them within its own database. This process results in the creation of a synchronized duplicate of the master’s data, providing a consistent dataset for read queries.
To summarize, in a MySQL master-slave configuration, the master server takes charge of write operations, while the slave server acts as a replica that mirrors changes from the master, concentrating on read operations. This segregation of roles enhances overall performance, scalability, and redundancy in database operations.
Before delving into the code implementation, you can locate the source code at the provided link.
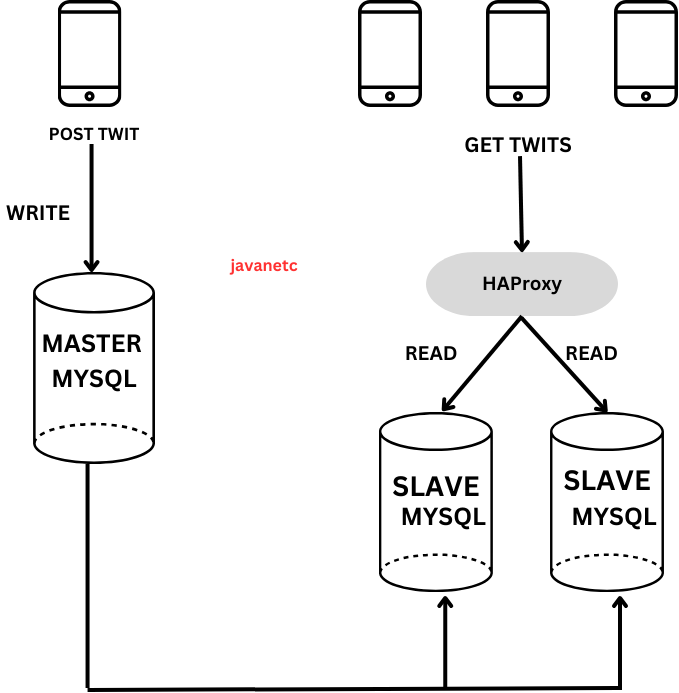
Imagine a system akin to Twitter, where the majority of activities involve reading (95% read, 5% write). To address this, our intelligent system leverages MySQL in a strategic manner. We distribute the workload by designating a central hub (the master) responsible for handling write operations, while multiple other components (the slaves) efficiently manage all reading requests.
Today, we’ll delve into the code, exploring how the system is intricately designed to seamlessly handle Twitter-like activities. Refer to the system diagram to understand the interconnected elements. This approach ensures not only the system’s ability to meet demands but also its efficiency in effortlessly managing the predominant read operations.
Consider platforms like Twitter or Eksi Sozluk:
- 95% of operations involve reading.
- 5% of operations involve writing.
It’s important to note that the data exhibits eventual consistency; for scenarios requiring strong consistency, it is advisable to explore alternative approaches.
Let’s start with a MySQL master/slave replication configuration:
Follow the steps:
First, create a network:
docker network create mysql-master-slaveNow, run the MySQL master container:
docker run -d -p 3307:3306 \
  --net=mysql-master-slave \
  --hostname=master \
  --name mysql-master \
  -e MYSQL_ROOT_PASSWORD=123456 \
  -e MYSQL_DATABASE=twitter \
  -e MYSQL_USER=twitter \
  -e MYSQL_PASSWORD=123456 \
  -v ./master-data:/var/lib/mysql \
  mysql/mysql-server:latest \
  --server-id=1 \
  --log-bin='mysql-bin-1.log' \
  --relay_log_info_repository=TABLE \
  --master-info-repository=TABLE \
  --gtid-mode=on \
  --enforce-gtid-consistency
Access the MySQL master container:
docker exec -it mysql-master sh
mysql -p -u root -p
Inside the MySQL shell, execute the following commands to set up replication:
CREATE USER 'master_user'@'%' IDENTIFIED WITH mysql_native_password BY '123456';
GRANT REPLICATION SLAVE ON *.* TO 'master_user'@'%';
Now, your MySQL master container is set up, and the replication user is created.
Note: Make sure to review and adapt the container and network configurations based on your specific requirements and environment. Additionally, ensure that the paths, such as ./master-data, are set up correctly and have the necessary permissions.
It looks like there are some typos in your provided commands. Here’s a corrected version:
Run MySQL slave1 container:
docker run -d -p 3308:3306 \
 --net=mysql-master-slave \
 --hostname=slave1 \
 --name mysql-slave1 \
 -e MYSQL_ROOT_PASSWORD=123456 \
 -e MYSQL_DATABASE=twitter \
 -e MYSQL_USER=twitter \
 -e MYSQL_PASSWORD=123456 \
 -v ./slave1-data:/var/lib/mysql \
 mysql/mysql-server:latest \
 --server-id=2 \
 --relay-log-info-repository=TABLE \
 --master-info-repository=TABLE \
 --gtid-mode=on \
 --enforce-gtid-consistency
Access the MySQL slave1 container:
docker exec -it mysql-slave1 sh
mysql -p -u root -p
Inside the MySQL shell, configure replication for slave1:
CHANGE MASTER TO MASTER_HOST='master', MASTER_USER='master_user', MASTER_PASSWORD='123456', MASTER_AUTO_POSITION = 1 FOR CHANNEL 'master';
START SLAVE;
SHOW SLAVE STATUS\G;
Run MySQL slave2 container:
docker run -d -p 3309:3306 \ --net=mysql-master-slave \ --hostname=slave2 \ --name mysql-slave2 \ -e MYSQL_ROOT_PASSWORD=123456 \ -e MYSQL_DATABASE=twitter \ -e MYSQL_USER=twitter \ -e MYSQL_PASSWORD=123456 \ -v ./slave2-data:/var/lib/mysql \ mysql/mysql-server:latest \ --server-id=3 \ --relay-log-info-repository=TABLE \ --master-info-repository=TABLE \ --gtid-mode=on \ --enforce-gtid-consistency
Access the MySQL slave2 container:
docker exec -it mysql-slave2 sh
mysql -p -u root -p
Inside the MySQL shell, configure replication for slave2:
CHANGE MASTER TO MASTER_HOST='master', MASTER_USER='master_user', MASTER_PASSWORD='123456', MASTER_AUTO_POSITION = 1 FOR CHANNEL 'master';
START SLAVE;
SHOW SLAVE STATUS\G;
Make sure to adjust the paths, permissions, and configurations based on your specific environment and requirements.
Continuing with the HAProxy configuration
Continuing with the HAProxy configuration, first, let’s create a user for HAProxy to check the master MySQL:
docker exec -it mysql-master sh
mysql -p -u root -p

-- Inside MySQL shell
CREATE USER 'haproxy_check'@'%';
UPDATE user SET plugin='mysql_native_password' WHERE user='haproxy_check';
SELECT user FROM mysql.user;
Now, let’s configure the HAProxy using the provided haproxy.cfg file:
global
    maxconn 4000
    user haproxy
    group haproxy

defaults
    mode http
    log global
    timeout connect 5000
    timeout client 50000
    timeout server 50000

listen stats
    bind *:8080
    mode http
    stats uri /
    stats show-legends
    stats enable
    stats auth tugay:tugay

listen mysql-cluster
    bind *:3306
    option tcpka
    mode tcp
    option mysql-check user haproxy_check
    balance roundrobin
    server slave1 mysql-slave1:3306 check
    server slave2 mysql-slave2:3306 check
Now, you can run the HAProxy container:
docker run -d --name haproxy_mysql \
    -v ./haproxy.cfg:/usr/local/etc/haproxy/haproxy.cfg \
    --net=mysql-master-slave \
    -p 8080:8080 \
    -p 3306:3306 \
    haproxy:latest
Ensure that the haproxy.cfg file is in the correct path and contains the configurations as provided. This HAProxy setup will load balance between mysql-slave1 and mysql-slave2 using round-robin balancing. The HAProxy stats are available at http://localhost:8080/. Adjust the configurations based on your specific environment and requirements.
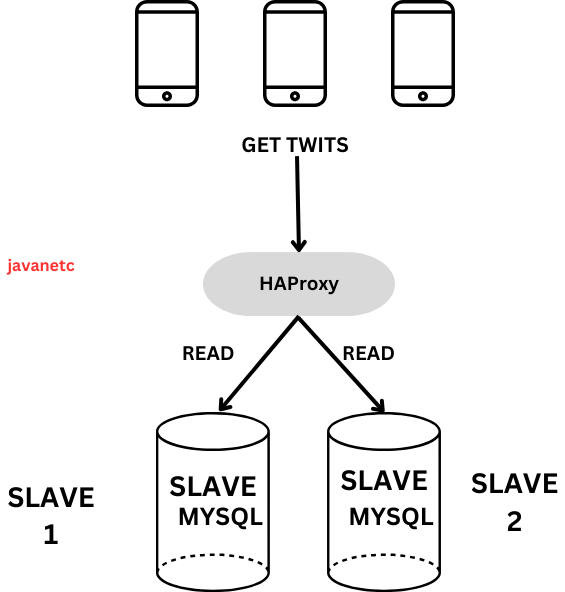
“We use HAProxy as a proxy for slave MySQL and use round-robin algorithm for load balancing. Our system has two different microservices:
For write operations (application.yml):
server:
  port: 8090

spring:
  datasource:
      url: jdbc:mysql://localhost:3307/twitter  # master mysql
      username: twitter
      password: 123456
      driver-class-name: com.mysql.cj.jdbc.Driver
  jpa:
    hibernate:
      ddl-auto: update
For read operations (application.yml):
server:
  port: 8091

spring:
  datasource:
    url: jdbc:mysql://localhost:3306/twitter  # haproxy -> slave1 and slave2
    username: twitter
    password: 123456
    driver-class-name: com.mysql.cj.jdbc.Driver
  jpa:
    hibernate:
      ddl-auto: update
Conclusion:
In conclusion, our exploration into optimizing a system inspired by Twitter’s read and write dynamics highlights the strategic use of MySQL master-slave replication. By segregating read and write operations and employing HAProxy for load balancing, we enhance performance and scalability. The described system architecture ensures an efficient and balanced handling of Twitter-like activity.
Happy Coding! 😊”


